


Building a hardtop - stainless steel works and installation of equipment (part 5)
- Sailing The Dream

- Mar 27, 2022
- 5 min read
Updated: Oct 24, 2022
After having rushed to complete the painting job before the winter weather settled in, the goal now was to get the new stainless steel supports built.
We requested a few quotes, and after hunting around recommendations from folks that had stuff done in the area of Fethiye we found a guy that would do the job at a very reasonable price. With that sorted, we moved into a marina so he could do the work. There were some bad and cold weather spells forecasted so doing it at anchor was not an option this time.
Being tied to a firm dock and slightly protected from the more violent gust by other vessels allowed us to start removing our huge solar panels, disassembling the DIY solar arch that we had built in 2019 and removing the entire original Bimini frame and Sprayhood. In one afternoon, just the two of us prepared the cockpit for the workers and stowed away all that we disassembled.
We were now ready for the new phase.
While we waited for the guys to show up (scheduling works when you do not speak the language is never easy and they understood work would only start the following day) we re-routed all the existing 12v wiring to suit the new design. We also installed the new mounting brackets for the solar panels by screwing them in the epoxied marine blocks embedded in the hardtop structure.
The following day the stainless steel guys came and helped us move the hardtop in position using some wood logs as supports so they could measure and confirm the angles for the new elements. It was a funny moment when four guys prepared to lift the hardtop, thinking it was extremely heavy only to find out it wasn’t. They were quite surprised that John and I could lift it reasonably easily just the two of us, although moving such a big structure into position was nearly impossible for us without the extra hands.
The process of measuring and defining all the angles of the new structure meant returning the hardtop to the foredeck quite a few times over the days, with them bringing the pieces partially finished to test fit and then taking them back for minor adjustments or completion. At the same time, they resized the pushpits to integrate them into the new structure while at the same time extending their length by nearly one meter.
The new structure was made entirely with 38mm diameter and 3mm thick 316 stainless steel tube, while the pushpit extensions were made in 25mm as per the original.
The new hardtop is supported by six poles with opposing and different alignments to ensure the structure is counterbalanced.


All poles are bolted to the hardtop at structural points where we installed epoxied marine plywood mounting blocks with an 8mm thick aluminium backing plate during the lamination process. This design choice allowed us to avoid bolting through the fibreglass which could create potential future water leak or water infiltration points.
Similarly, to ensure a good strong fixing connection to the hull we decided to use mounting plates and backing or brackets with generous sizes and a thickness of 8mm but in 316 stainless steel. Oversize seemed to be a good way to approach our concerns of forces being exerted in different directions causing stress on the fibreglass.


The stern and aft supports are locations that were originally used to either mount the pushpit or the sprayhood, so they have just an oversize mounting and backing plate, while the two central supports that also carry most of the weight of the solar panels got most of our attention with an oversize mounting plate on the cockpit floor, paired with a generous gusset bracket under the deck mounted also on the fibreglass bulkhead with a backing plate and to ensure there was no lateral movement a mounting plate at the helm station console. These two poles also were given gussets and a wider mounting plate on their connection with the hardtop for the same reasons.


It took them five days to complete the Bimini works (they were doing some other works for us at the same time that do not belong to this project but needed to be done together) and a lot of help to get in tight spots where the backing plates and brackets needed to be mounted.
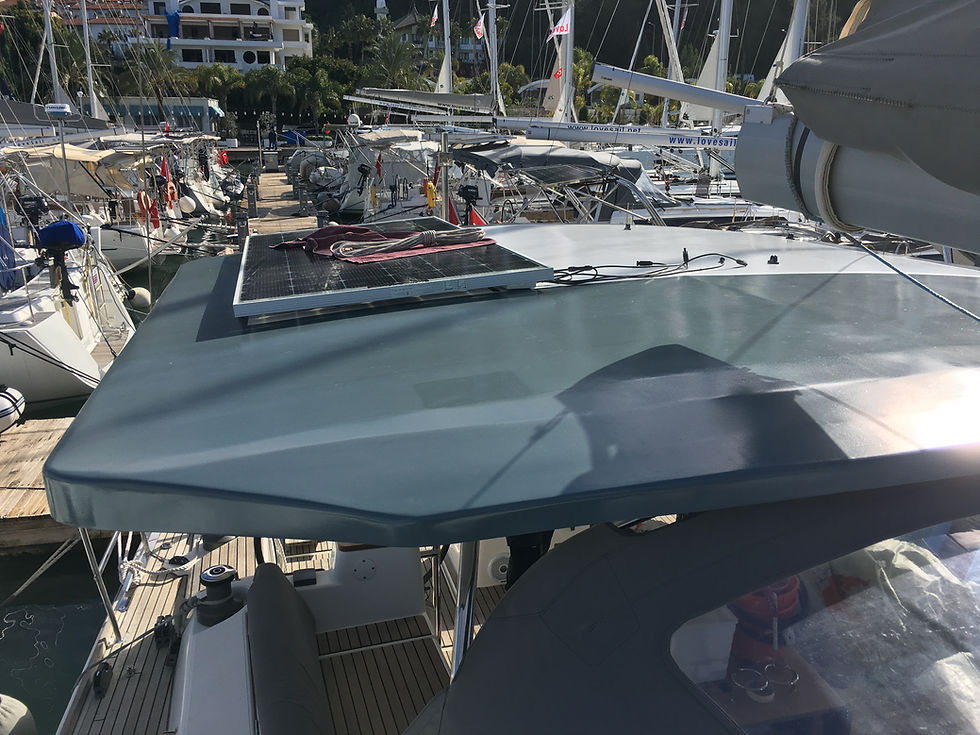
With the hardtop now in place, we could finally re-install the solar panels, a task that would take an entire day despite our thoughts that it should be a straightforward task.
We had planned to use the aluminium angle pieces, we had used previously on our DIY solar arch, mounted on UV resistant plastic brackets (previously we had used the tubular version of these brackets with great success) that we bolted in the locations we had installed epoxied marine plywood blocks for this purpose during the lamination process. What we forgot to check was how tight the gap between the hardtop and the solar panels would be and how would we bolt them in such a tight situation.
I spent a good portion of the day on top of the hardtop bringing the panels to position with John's help and drilling the new holes on the aluminium brackets before bolting the panels. It took many attempts from both of us with different tool arrangements to be able to get the last bolts done.
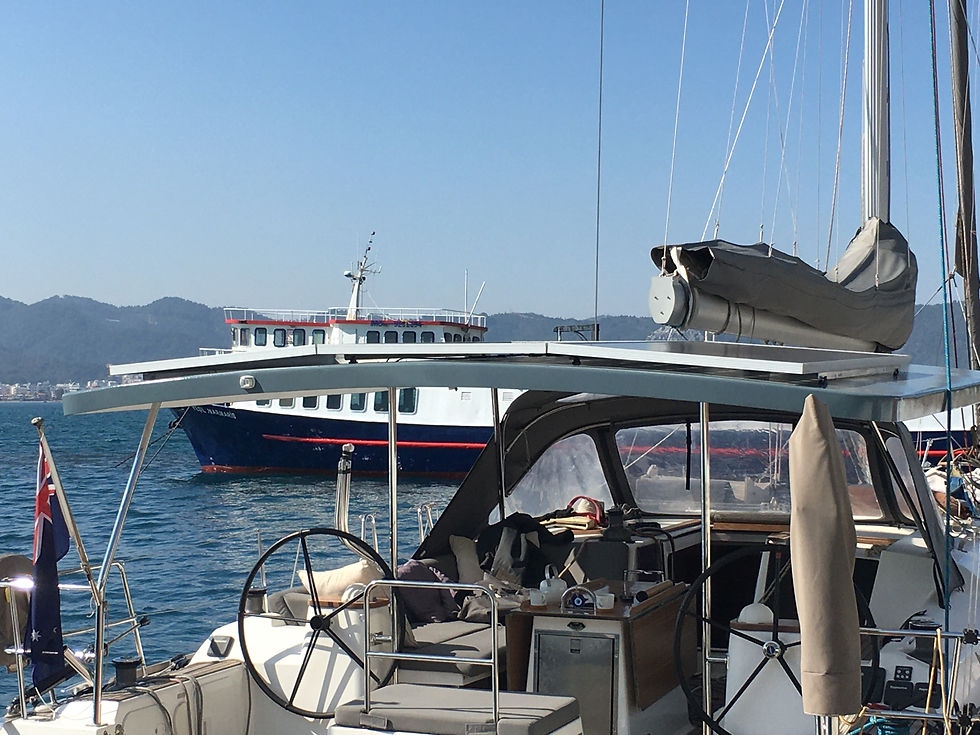
The final result was a super slick fitting of the panels on the hardtop just like wanted.
A very low profile presence.
Stage 5 - stainless steel works, installation of equipment period daily work summary/description:
Day 52 (2022-01-13)
Arrived the marina to prepare for the new stainless steel support frame construction.
Removed solar panels, disassembled the DIY solar arch and disassembled the existing Bimini frame.


Day 53 (2022-01-14)
Prepared all original 12v wiring to be rerouted as per the new arrangements.
Installation of the new solar panels brackets.
Day 54 (2022-01-18)
Beginning of stainless steel works.
Positioning of fibreglass new Bimini in place using wood props.
Mid vertical poles cut to measure and tack welded in the correct position. Front diagonal poles cut to measure and tack welded in the correct position.
Removal of both front and middle poles back to the workshop to make the welds pretty. Return of fibreglass new Bimini to the coach roof.


Day 55 (2022-01-19)
Return of the Bimini to final position.
Pre-installation of front and mid poles. Removal of back cleats, backstay and pushpits to template the deck reinforcement chain plates (different project), extension of the pushpits and integrations of the back poles in the pushpits structures.
Moulding of the side mounting plate of the mid-poles.
Day 56 (2022-01-20)
Installation of front poles and deck reinforcement plates.
Installation and on-site construction of new pushpits and back poles. Re-installation of the back cleats, backstay.
Day 57 (2022-01-21)
Installation of the mid-poles and under deck reinforcement plates.
Day 58 (2022-01-22)
Rainy day, so work was limited to tidying up the cockpit locker, the stern locker and the saloon.
Day 59 (2022-01-23)
Final installation of new structure and adjustment of the pushpit extensions.
5 bolts missing.
Day 60 (2022–01-24)
Installation of the outstanding 5 bolts.
Installation of the solar panels back on top of the Bimini using brackets screwed into the epoxied marine ply bases embedded in the fibreglass.
Cleanup of sealant and removal of old deck fittings no longer required.


***You can find other posts of this series at Building a hardtop - the idea, concept and material choices (part 1) , Building a hardtop - the construction (part 2) , Building a hardtop - Fairing (part 3) , Building a hardtop - joining the pieces and painting (part 4) or Building a hardtop - costs, other numbers and conclusions (part 6)
***In the spirit of sharing our dreams and experiences we have shared this blog post in the NOFOREIGNLAND.COM website sailors community.
Outstanding job!