


Building a hardtop - the construction (part 2)
- Sailing The Dream

- Feb 12, 2022
- 7 min read
Updated: Oct 24, 2022
With the decision of building the Bimini on the foredeck, we wasted no time while still waiting for a few work supplies (roller covers, masks and the epoxy), we set about building a proof of concept mockup sample. A 400x400mm section, including the rounded edge detail.
We sampled the different fibreglass clothes and the epoxy additives (silica, wood fibres and micro balloons), tested the sample for impact and rigidity.


We then found a good enough spot in an anchorage that we know usually does not get strongly affected by weather spells on the Gocek park. Tied the yacht in good old fashion Med mooring to the shore (stern to the rocks) and prepared for work.
If the work advanced while in Greece during the winter of 2020, when all XPS foam was cut to and shaped to size, was considered to be Stage 1 - Design and preparation, the post-summer 2021 Turkey works were considered as Stage 2 - Construction, with the assembly of the XPS foam pieces and fibreglassing. Stage 3 - Fairing, while Stage 4 was Joining the two pieces and painting. Stage 5 was the installation, with all the stainless steel works and reinstallation of the solar panels.
The beginning of Stage 2 was the most daunting. The biggest challenge was indeed the space to work!
We built some XPS foam support cradles on the foredeck, with only inches to spare to move around it. Propping off the deck with spacers and blocks of foam, divided the Bimini construction into two pieces and with that, we started working with the conditions we had.
We could now pick up the project at the point we had stopped it earlier in the year, at the end of winter.
The XPS foam used for the core of the Bimini had been cut into 300mm by 1850mm strips with a 5-degree angle edge along its length (on one side only), making it easier to bend them to our desired shape.
We then kept that shape by laying a few blobs of hot glue and after by a bonding bead of thickened epoxy between the boards, like stiffening ribs. This beed of thickened epoxy would also allow a bonding point between the underside and topside faces of the new structure.
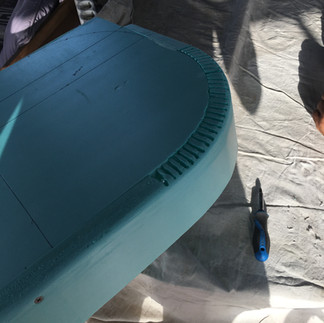
We assembled the edge lip in its position, marked the beams setting-out and the fibreglass setting-out plan as per our design, and just like that things were getting real.
The Bimini was gaining shape right in front of us!
The next few weeks would see us fibreglassing almost every day.
First, we worked on the port side piece and then on the starboard side piece, with a few intervals in between steps to allow the fibreglass to cure and for us to prepare for the next steps of this work stage (preparing the beams fibreglass cloth, the final reshape of the pieces).
At the end of each workday, all the fibreglassed areas were protected with a layer of peel ply to reduce the amine blush reaction and give us a paintable surface without the necessity of sanding the whole surface first.
The completed work was left in the sun to enhance the curing process.
During this construction period, we also made provision for 12v wiring for lighting and security systems and embedded epoxy coated marine ply mounting blocks and aluminium bearing plates in the structure.
Most days, we worked intensively but just a bit longer than a half-day working hours. The challenging working conditions meant seriously awkward positions for long periods causing us back pain.
The real reason for the "taking it easy" approach.
We believe that in a proper workshop we would have been able to complete this stage in roughly half the time it took us and the final result would be better, but we are satisfied with our decisions.
In the end, we laid nearly 100sqm of the different types of fibreglass cloth and used around 36kg of epoxy resin!
Twenty days of work spanned nearly a month, out of which nine fibreglassing, the remaining preparing materials, phases, etc.
Stage 2 - Construction period daily work summary/description:
Day 1 (2021-10-02)
Prepared the cockpit to start working on the support box frames. Removed the cushions and pillows, removed the cockpit table rail to get a bigger flat surface to work.
It took us the entire morning to produce the first of three support box frames, stopping regularly to check alignments and confirming all was squared.

Day 2 (2021-10-03)
We completed the two other support box frames in slightly less time than it had taken us to do one the day before.
Day 3 (2021-10-04)
Joined all boxes, levelled the space to work and dry fitted all Bimini XPS panels.
Tried to conform the pieces to the desired shape using random weights such as rice and pasta packs. Left it in the sun and overnight to let physics do its thing.


Day 4 (2021-10-05)
Hot glued all pieces together to keep them in the desired shape and position. We installed all edge pieces using hot glue and specially cut wedges to keep them in place and at the correct angle.
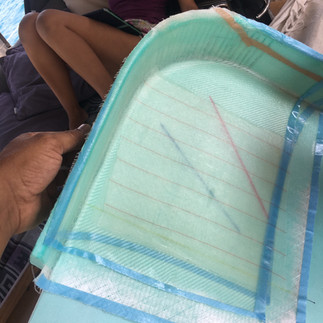
We drew all the guidelines for the structural beams and the setting-out lines for the fibreglass cloth application.
Pre-cut all the different fibreglass cloth pieces needed from each type, including peel ply and the veil for the following day task.
Day 5 (2021-10-06)
Applied thickened epoxy to the groves between B4 and the stern using microfibres applied to the mix. Then laid a layer of biaxial, a layer of twill, a layer of veil and the peel ply. The first section we worked on was around 1.5 x 2m. Applied all layers wet on wet, made sure we did not overwork the mix past the time frame of 40mins.
It was well into the process when we realised that John had messed up the mix ratio of the epoxy. Instead of mixing a ratio of 1 to 2 parts we had mixed 1 to 3, but this did not seem to affect the epoxy, all mix ratios made after we're done correctly.

Day 6 (2021-10-07)
Fibreglassed the other section of the inner side piece 2.4m x 2m as per the process of the previous day. Discussed and decided how to install the beams.
Day 7 (2021-10-08)
Prepared for the main beam installation.
Removed the peel ply from the beam zones. Cut the necessary fibreglass strips, cut out the areas for the pre-prepared plywood inserts for vertical supports (from the already prepared XPS pieces).
Prepared the 12v wiring for lighting to be installed in the main beam.

Day 8 (2021-10-09)
Installation of the main beam - hot glued in place (12v wiring already in position under the beam) and then epoxied and fibreglassed with a layer of biaxial, a layer of twill, a layer of veil and the peel ply.
Prepared for the installation of the small beams just like it was done the day before.
Day 9 (2021-10-10)
Installation of the small beams in the same fashion, like done for the main beam.


Day 10 (2021-10-12)
Flipped the structure to work on the topside. Pulled the 12v wiring for the lighting to the right side of the Bimini, marked out the solar panels and the Bimini support structure. Cut the excess XPS foam from the front edge and sand it to shape like the rest.
Prepared and protected the work for the forecasted thunderstorm.
Day 11 (2021-10-13)
Levelled and propped the flipped Bimini piece to prepare for the topside works.
Removed the XPS foam from the areas where the epoxied plywood inserts (where the vertical supports are to bolt too and where the solar panels are to be mounted) needed to be installed.
Removed the excess thickened epoxy that bled from the underside, sanded the remaining edges to ensure good bonding.
Prepared the 8mm thick aluminium bearing plates (abraded their surface with sandpaper)
Day 12 (2021-10-19)
Installed the aluminium bearing plates and the marine plywood inserts embedded in thickened epoxy.
Fibreglassed the entire topside in the same fashion like done previously on the underside.


Day 13 (2021-10-21)
Removed the finished piece from the form and laid it forward of the mast.
Realigned the form and prepared the works to start the starboard piece.
Dry fit and hot glued all pieces together to keep them in the desired shape and installed all edge pieces just like done on the port side piece.
Drawn all the guide lines for the structural beams and the setting-out lines for the fibreglass cloth application.
Pre-cut all the different fibreglass cloth pieces needed from each type, including peel ply and the veil for the following day task.

Day 14 (2021-10-22)
Applied thickened epoxy to the groves between panels using silica powder (had run out of the microfibres) applied to the mix. It did not work as well as with the microfibres leaving large runs on the opposite side of the panel.
Then applied the biaxial, the twill, the veil and the peel ply following the strategy used on the port piece - doing the area from the B4 beam to the stern. Then we carried on to fibreglass the remaining area of the piece, instead of doing it the following day.
Now that we had a good gauge of the time we needed to lay that amount of fibreglass to that area we decided to go full steam ahead and complete that task on one day instead of two.
Total 8h of non-stop work.
Day 15 (2021-10-23)
Prepared for main beam and small beams installation.
Removed the peel ply from the beam zones. Cut the necessary fibreglass strips, cut out the areas for the pre-prepared plywood inserts for vertical supports.
Day 16 (2021-10-24)
Installation of big beam and fibreglassing.
Day 17 (2021-10-25)
Installation of small beams and fibreglassing
Day 18 (2021-10-26)
Flipped the structure to work on the topside.
Preparation of starboard side topside for fibreglassing.
Marked out the solar panel's position and the Bimini support structure. Cut the excess XPS foam from the front edge and sanded it to shape as the rest of the edge.

Day 19 (2021-10-27)
Installed the aluminium bearing plates and the marine plywood inserts by embedding them in thickened epoxy.
Fibreglassed the entire topside in the same fashion like done previously on the underside.
Day 20 (2021-10-29)
Removed the finished piece from the form and laid it forward of the mast, on top of the other piece.
Disassembled the cradles and prepared some foam bearing blocks to re-stack both completed fibreglassed pieces on top of each other on the workspace between the mast and the companionway to start stage 3.

Time for a well-deserved break and a couple of days of rain before embarking on the next step of this project.
***You can find other posts of this series at Building a hardtop - the idea, concept and material choices (part 1) , Building a hardtop - Fairing (part 3) , Building a hardtop - joining the pieces and painting (part 4) , Building a hardtop - stainless steel works and installation of equipment (part 5) or Building a hardtop - costs, other numbers and conclusions (part 6)
***In the spirit of sharing our dreams and experiences we have shared this blog post in the NOFOREIGNLAND.COM website sailors community.
Comments